Welcome to Jaya International Co., Ltd one-stop shopping solutions for large solid wood machinery

How to use a jointer in 2023: step by step guide
Quick guide
1. Ensure Coplanar Tables
2. Square Up The Fence And knives
3. Know Your Length Limits
4. Depth Of Cut
5. Reading Grain
6. Proper Feeding Procedure
If you want to know more about the steps to set up the jointer, please continue reading below!
Article introduction
Nothing beats owning a jointer when you need to sand planks smooth and grind them down to the exact dimensions your project requires. Before that, jointers were usually found only in woodworking shops, but they're now cheap enough for enthusiastic DIY use.
Many woodworking projects require the ability to render a perfectly square edge on a board.There are many ways to perform this task, but nothing matches the performance, precision and repeatability delivered by the motorized jointer.Getting the jointer to deliver on its potential is not particularly difficult, but, like most things, it requires proper procedure which can be broken down into a few simple but important steps.
Plus, if you don't already own a jointer and are considering buying one, we'll help you understand the value it will bring you and answer some questions you may have. Let's get to work!
Required Tools for this Project
Have the necessary tools for this DIY project lined up before you start- you’ll save time and frustration:
Dust mask
Hearing protection
Safety glasses
Engineer's square
And, of course, a jointer.
About the jointer use: a step-by-step guide
(1) Make sure the infeed and outfeed tables are coplanar.
That means when the infeed table is at the same level as the outfeed table. both tables are in a straight line from one end to the other. when you lower the infeed table the tables are no longer coplanar. but they must be parallel, this is critical.
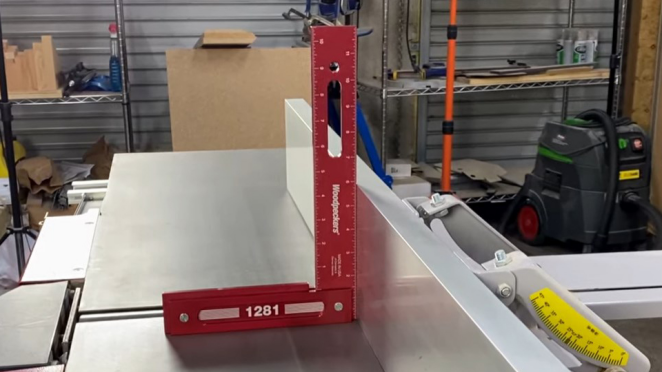
(2) Proper setting of knives and fence.
The knives must be set at the same height as the outfeed table, or within 1000 higher. You do not want the knives set lower than the outfeed table. And last, you need to adjust the fence to 90 degrees, here you better use engineer's square.
(3) Know the upper limits of your jointer can handle.
The upper limits of what your jointer can handle is more of a quality than a safety issue. My guideline here is to limit the length of board to no more than twice the length of your infeed table. A quick test for this is to set the board on the infeed table and if it balances you should be able to achieve a straight edge with proper technique. If you run into a situation where you need to joint a board longer than your jointer is capable of, I recommend using a router and straight edge, which is tedious but works well. I am not a fan of trying to configure auxiliary infeed/outfeed tables for a jointer as it is difficult to consistently produce good results this way.
(4) Depth of cut.
Set your depth of cut so that it makes noticeable progress with each pass but does not burden the motor. I normally set the depth of cut on my jointer to approx. 1/32″, and often make two passes to remove enough stock to produce a perfectly square edge. The additional time investment is minimal and I get better results with more light passes than with one heavy pass. Especially when you plan some precious wood, don't try to cut the required thickness in one go as this could make the planer jump, tear the wood and create a bumpy finish. Plane in small quantities until final thickness is achieved.
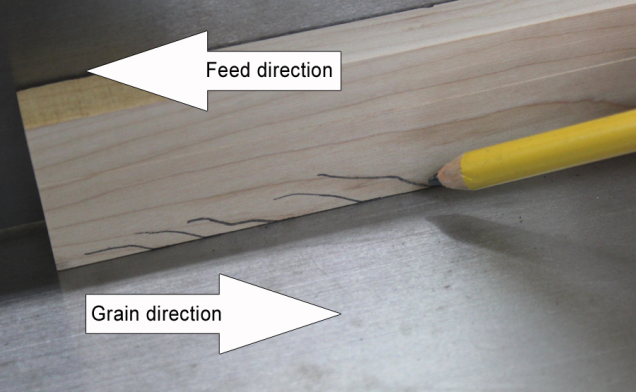
(5) Reading grain: avoiding tearout.
The direction that grain is running in your stock can affect the surface quality of your jointed edge. The result can range from virtually no effect to dramatic, depending on wood species, sharpness of knives, depth of cut and feed rate. I generally don’t bother reading the grain for edge jointing unless I am encountering a problem, because most of the time when I am edge jointing the surface will not be exposed in the finished project. But if you experience chatter or tearout as you are jointing, it is important to understand how to read the grain to minimize or eliminate the effect. You’ll be able to tell which end to feed into the planer by inspecting the grain (or to be precise, the direction of the fibers). When you’re planing the wide surface of the board, inspect the grain on the narrow edge. When you’re planing the edges, inspect the wide face. On rough lumber, you can feel the fibers by running your hand over the board. It will be smooth in one direction and rough in the other. Feed the smooth direction forward into the wood planer. With some boards, you might get tearout in both directions, then the best approach is to take a small amount of wood off with each pass: 1/32 in. is about right.
(6) Proper feeding procedure.
Firm, steady, modest pressure.
The force required to move the material is in the horizontal direction, when the material touches the cutter there will be multiple forces acting on the material both vertically and horizontally, which means you not only need to apply more force horizontally to To counteract the friction of the knives, a downward force is also required to keep the board from being lifted by the knives. The deeper the cut, the more reactive force you need to apply.
Remember the only downward force needed, is to counteract the knives pushing up. Now you've probably all seen these foam push sticks, they're practically in every jointer video, and come with most jointers when you purchase one.
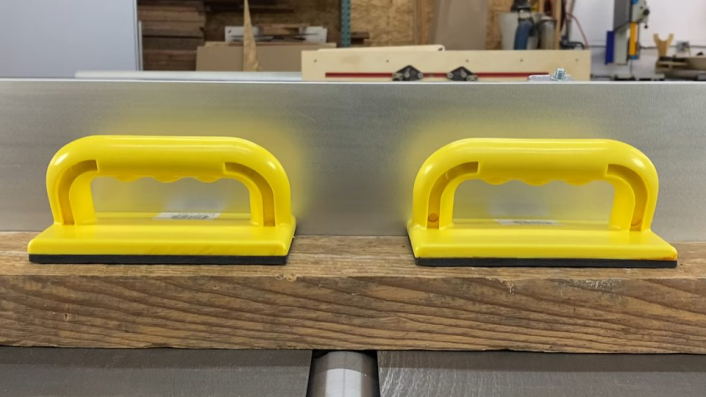
Unfortunately they are a big reason people have trouble getting boards flat, these pads require way too much downward force to move the material forward, but we don't need very much downward force. Any pushed if you use, should be designed to push the material forward, like the one you see here.
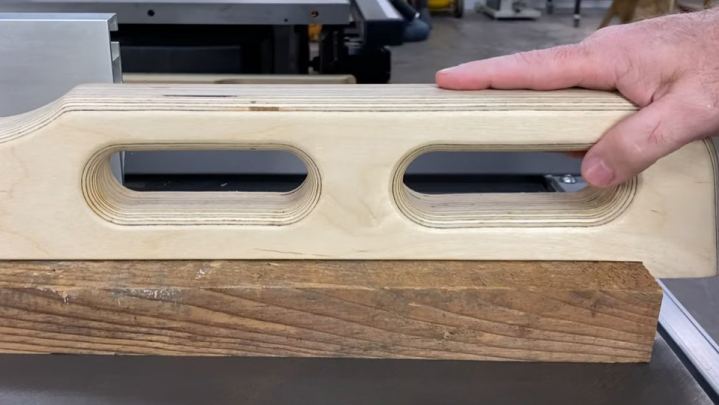
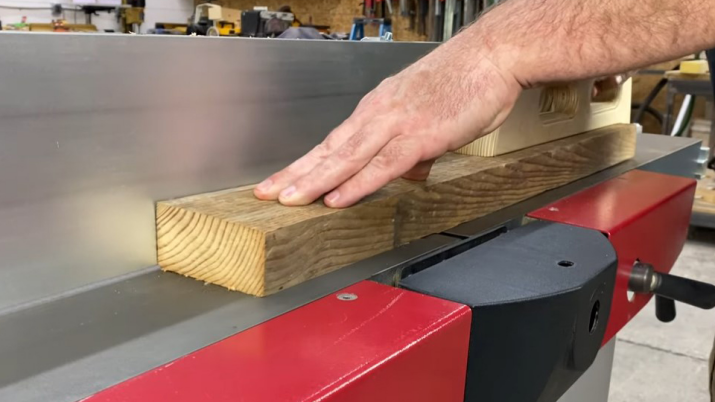
Left hand holds, right hand pushes.
The left hand should remain in the same position for the duration of the cut, maintaining both downward pressure as well as holding the board firmly against the fence. At this time your right hand should continue with steady feed pressure as well as pressure toward the fence, maintain a steady feed rate.
Maybe you want to learn how to use jointer with a video? This tutorial has over 20,000 plays and it should help you.
How to set up and use a Planer Thicknesser/ Jointer Planer and Flatten and Square Lumber
The jointer is one of the best time-savers ever invented, replacing the long session of hand planing it used to take to level and square each piece of lumber. Now you know how to use it safely.
About the jointer use: Safety Guidelines
1. When planning a length of timber (especially some precious timber), don't try to cut the required thickness in one go as this could make the planer jump, tear the wood and create a bumpy finish. Plane in small quantities until final thickness is achieved.
2. If the machine you are using doesn't have auto feeding function, make sure you have a tool (like a piece of wood) to finish pushing the timber length through, this keeps your hands from touching the cutting blades. No one wants to get hurt during processing, right?
3. I recommend that you always wear gloves, a dust mask, and goggles when working with machinery that generates dust, debris, and sharp parts.
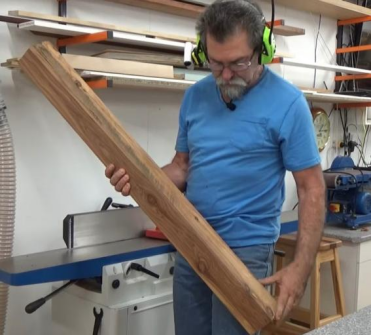
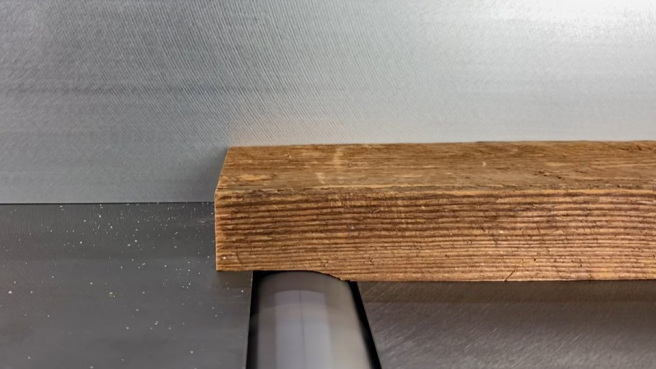
4. Many of our customers are using jointer to reclaim wood, which is a very profitable industry.
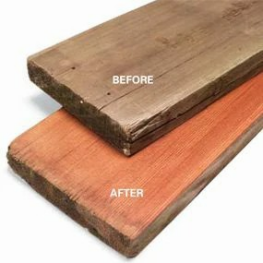
This dingy, scarred piece of decking retrieved from a dumpster became valuable vertical grain redwood after a few passes through the planer. I figure the high cost of quality lumber makes it worth it, even if it means replacing a $30 set of blades once in a while.
If you also want to try this project, the most critical step is to carefully inspect the screws and nails before machining. Also, use a wire brush to remove dirt and any kind of finish from the plank before machining to prevent the creation of toxic dust.
5. If wood is thicker at one end than the other, plane by inserting the thicker end first.
If you have read the above article, I believe you already have the skills to operate the jointer perfectly. The following articles will introduce you to the value that jointer can bring to you, and answer some questions that may be troubling you. If you are interested in this, please continue reading below.
Why you need a jointer?
No one wants their money spent unnecessarily. Adding a jointer to your tooling can save you tons of money. With the ability to plan the lumber yourself, you can save a lot of money by buying rough lumber instead of pre-planed (usually rough lumber will be 30% to 50% cheaper than pre-planed). If you're planning some big woodworking projects like making furniture, a jointer will pay for itself in no time. Even if you choose preplaned wood, it will often warp. The jointer will correct any irregularities, ensuring the precision of your project.
What does a jointer do? Do I need a Jointer?
What's the difference between jointer and thicknesser?
We will use an irregular block of wood to understand the difference between jointer and thicknesser processing.

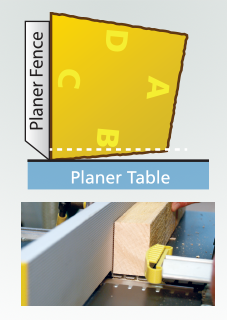
How a Thicknesser Works
First, we take surface C as the horizontal plane and cut surface A so that it is parallel. To planer the surface C we need to rotate the block 180º and pass it through the thicknesser again.
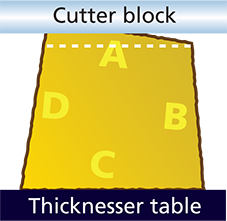
Repeat for surface B&D, and finally we make each surface parallel to each other.
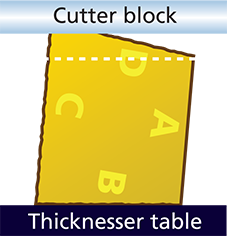
You may have found that if we only use the thicknesser, although we can create parallel planes, we cannot make the surface B&D perpendicular to the surface A&C. No matter which direction you turn the wood, you will only get parallelogram blocks.

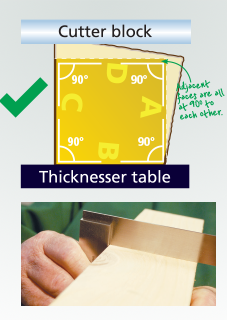
How a jointer Works
Use the machine in planing mode to plan surface C.
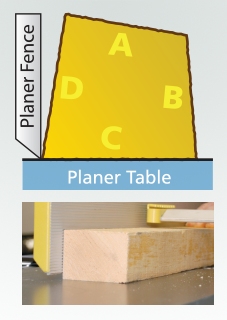
Place surface C against the fence set at 90º, then plan surface B until it is 90º from surface C.
Once we have surface B perpendicular to surface C, the remaining surfaces A&D can be planed by using surface C&B respectively as parallel planes. In this way, we can easily get a cube of wood.
FAQ
1. How can you prevent damage from using jointer?
(1)Adjust the knives correctly: Properly adjusted knives will give you the best results, so make sure they're set correctly before you start.
(2)Use a sharp blade: A dull blade can cause more problems than a sharp one, so make sure your blade is sharp and replace it if necessary.
(3)Take shallow cuts: Make shallow cuts instead of deep cuts to avoid damaging the blade and the board.
(4)Use infeed and outfeed supports: These supports will help keep the board straight and prevent it from warping.
(5)Clean the planer regularly: Regular cleaning will keep your planer running smoothly and prevent damage to the blades and the board.
2. Why does wood chip out when using jointer?
(1)Type of wood: Some woods, such as pine and spruce, have a softer and more uniform texture, which makes them easier to plane. Other woods, such as oak and maple, have a harder and more porous texture, which makes them more prone to chipping.
(2)Age of the wood: Older, dried wood is more brittle and prone to chipping than fresh, green wood.
(3)Grain direction: If the grain direction of the wood runs parallel to the direction of the planer blades, it is more likely to chip. If the grain direction is perpendicular to the blades, it is less likely to chip.
(4)Sharpness of the planer blades: Dull planer blades are more likely to cause chipping because they can't cut cleanly through the wood fibers.
3. Will using jointer to remove glue from wood cause any damage to the machine?
It can damage the knives and can cause the shavings and chips to form clumps, and clog up the works. Better to remove the glue residue and "squeeze out" using a scraper, chisel, putty knife, or sander first.
Extended knowledge about jointer
What is jointer snipe?

Snipe is a term used to describe the planer gouge that often occurs at the beginning and end of boards as they enter and leave the planer.
Related recommendations
Best quality, best service
 How to use a rip sawHow to use a rip saw
 How to Use a Brush Sander for a Smooth and Professional FinishDiscover the benefits of using a brush sander and learn how to use it like a pro with this step-by-step guide.
 How to use a table saw : making your first cutsNamed for the table that supports the material being cut, the table saw is a very simple yet efficient tool that you can think of as a more powerful upside-down circular saw mounted on a table. Instead of moving the saw to cut, it moves the wood, which allows for greater control over precision and efficiency.
 What does a jointer do? Do I need a Jointer?Of course, store-bought lumber already has flat surfaces and edges, if you're a beginning woodworker, they'll be more than enough for most purposes. Building high-quality furniture requires, however, need smoother, flatter, straighter edges than those on factory-milled wood, and for them, a jointer is essential. Jointer is also a handy tool for anyone who works with rough or reclaimed lumber.
- Wide Belt Sander vs Drum Sander: Which is Better?Are you in the market for a sander? Learn about the differences between a wide belt sander and a drum sander to determine which one is best for your needs.
- How to use a jointer in 2023: step by step guideMany woodworking projects require the ability to render a perfectly square edge on a board.There are many ways to perform this task, but nothing matches the performance, precision and repeatability delivered by the motorized jointer.Getting the jointer to deliver on its potential is not particularly difficult, but, like most things, it requires proper procedure which can be broken down into a few simple but important steps.
 Straight Line Saw vs Circular Saw: Which is Better for Your Woodworking Needs?Are you trying to decide between a straight line saw and a circular saw for your woodworking needs? This guide breaks down the differences between the two to help you make the best choice.
- What is Tenoner Mortiser Machine and How to Use ItDiscover the main functions and components of a Tenoner Mortiser machine, as well as all its advantages and applications, with this comprehensive guide. Start using yours like a pro today!
- The Ultimate Guide to Solid wood Furniture ManufacturingIf you're looking for an overview of the entire process of solid wood furniture manufacturing, look no further! This ultimate guide covers everything from start to finish.
- 5 Reasons Why Woodworkers Need a Multi-Rip SawGet an accurate, repeatable cut with a multi-rip saw. Find out why these saws are so necessary for woodworkers and how you can make the most of them in this post.
- The Benefits of Using 4 sided planer in Your Woodworking ProjectsTake your woodworking projects to the next level with 4 sided planer. Learn the many benefits that this tool has to offer and get started today.
- Woodworking 101: What is a Rip Saw Machine?Rip saw machines are an essential tool for any woodworker's workspace. This device is used to cut lumber into the desired shape with a precise and clean finish. Read on to find out more about what rip saw machines are, how they work, and tips on how best to use them.


PRODUCTS
FOLLOW US:
Leave A Message
Please fill in the form with your details and we will get back to you as soon as possible.
Please give us a message
The More You Know Us, The More You Trust Us!
We trust that our experience and intimate knowledge of this line will entitle us to your confidence.
Email: sales@jayacn.com
Add: NO.216 Zhongkai Road, Qinshui Industrial Park, Muping District, Yantai City, Shandong China